Saturday 31 December 2011

Santa's Sack....


Is now definitely empty. It was stuffed with great big boxes - sometimes only 'great big' is good enough. And what a diverse pair of kits they are. Boxes like these stand up to repeated explorations. For the moment, they are living on the coffee table in our living room, where I can inspect them at will. It may be some time before I get to build them but there's a lot of pleasure in the anticipation.


I also have the 1/48 F3H Demon and 1/72 A-10B N/AN, both from Hobby Boss, well on the way. I am also on with the Hasegawa A6M8 Zero, which requires the Big Ed set fitting - a long term project which I will report back on later.

I hope you've all had a good Christmas, and we wish you all the very best for 2012. Back to the bench for me.

Wednesday 14 December 2011

More of the A-10


Just an update on this build. As you can see, I'm well on with the paintwork now.
First I gave the model an undercoat, and then later on, some pre-shading. Then I added a stiff coat of grey/olive drab and set it aside for a good 24 hours to dry and harden. Using the overall colour as a base, I added about 30% mid-stone. I wanted to subtly lighten it a full tone and highlight the panels. To finish I added 10% bright lemon and applied this shade to the upper panels only. The photos show the model about half way through this process. A subtle difference that makes all the difference.


After a coat of glaze has been applied, it will be ready for its decals. Back soon with more details.

Wednesday 7 December 2011

Yakking on...


More then on the Yak 38 from Hobby Boss.

So how has it built up? Mostly very well. The only thing was a slight mis-alignment on the main air intakes. Thankfully I was able to get past this without major filling and rubbing down. Can't be losing all that lovely detail.

As you can see, the photos show the paintwork and decaling pretty well finished. Incidentally, the decals were nice quality with good register, clear enough to see that the stencilling was in Russian, and Russian is not one of my languages...I was looking everywhere for the anti-glare panel decal and it was only after many minutes of feverish searching that I realised I had to paint it on myself. With all the other decals now fitted it was too late for that. Trawling through my decal box I discovered a pair of heat shield decals for a 1/48 Sea King I built when Adam were a lad. After a spot of trimming I had a pretty close match. Check the photo, what do you think? Overall it's been a great build and great value at £22.


So far Christmas seems to be shaping up well, with some very nice looking festive items arriving in large boxes, but I'm not allowed to look at them. I'll share the details when I can.
Coming along nicely for the moment is the A-10B Warthog 2-seater - that will be an impressive build.


And shortly, more on a Mitsubishi A6M8 based on the Hasegawa kit. This has some lovely extras with it and promises to be a super build.

Thursday 1 December 2011

Up next.


Earlier I was going on about what you might wish for. Well, look what arrived in the morning post. When everyone else was building the A-10A I wanted to build the two-seat version - there was always something a bit menacing about it.


On opening the box, I noticed that I was not the first to have a dip. Both cockpits - and they are quite lovely - had already been assembled. Everything else was present and correct and looking really good. Surface detail is superb, but the real bonus is a complete set of ordnance. There will certainly be more on this build later.

Coming along rather well is the Yak 38. As you can see, the nose section is almost complete. The only addition needed was a pair of lap straps to the ejector seat. Nice, isn't it?


Did I mention that both these kits are by Hobby Boss? Well, they are, and if you check the December issue of the SAMI mag, you'll see a more than two pages of previews. Hobby Boss seem to be using the economic downturn to release a big influx of top quality kits at very reasonable prices - this at a time when Hasegawa are pricing similar kits for £60 and upwards. It's good for Hobby Boss and it's very definitely good for the likes of me.

So I'm off to the model shop.

Saturday 26 November 2011

I wish for


If you wanted to complete your Soviet or US Navy collection then the two new releases from Hobby Boss must be a wish come true.

Check out the Yak 38 'Forger', the poor copy of the Harrier, and the F3H Demon, the fighter everyone hated. Like them or not, they are none the less part of naval aviation history. Not too long ago, if you wanted either of these classics you would have to compromise with a nasty vac-from kit or something expensive in resin, and probably accept 1/72 scale. If I had given one of those a go it would have been three months on the workbench and then a short chuck into the naughty box. These days you only have to wish, and as long as you're prepared to pay, you can have what you want.


Not only are both these kits beautifully moulded with four decal options each, but they are also attractively priced. When I've got my references together I will be getting the builds underway. For the moment, can you guess what is in the photo? I'll be disappointed if you can't. It's a project close to finishing, so more photos of it soon.


Monday 31 October 2011

This just in -


An interesting project was this old Tornado from Revell. It came to me about 70% complete, but reduced almost to its earlier kit form in order to be posted. The owner had done a pretty good job considering it's such a problematical kit to begin with, but I think he had lost patience with it, and I know the feeling. Anyway, with a little extra work and another three weeks, the job was complete.


Also - a preview of two other projects recently completed. First, the EA-6B Prowler in 1/48 from Kinetic.


And second, the old Monogram P-61 (remember it from en earlier blog?) dragged kicking and screaming into the 21st century.

More, as always, on these later.

Something old, something new....


...nothing borrowed and mostly blue. A sort of mini-view of part of my current stock. And all will be forthcoming builds. It's only the FW 190 that I'll build right out of the box. All the rest require new decals and/or photo-etched parts.

The old Curtiss Helldiver, although it comes with its own set of photo etched they are mostly for dive flaps, so I've added a fine set of Eduard coloured bits.

Even though the new F-100F offers four aircraft to choose from in the box, including Thunderbirds , it's waiting for a new set of decals. The older P38J will definitely be updated. Have you seen how boring the thing is? Dick Bong's Down Beat?

Of course, the builds will all be on here, just as soon as I get to them...

Wednesday 5 October 2011

There's always more


When it comes to our hobby (and the source of my income) I am always grateful that we live in a time of plenty. The choice for the modeller is endless. So why do I have a forty year old kit sitting on my bench? This is my fourth P-61 kit in as many years. Of all the new toolings that are currently available, why am I still dealing with such ancient plastic? Perhaps it's just a case of bad timing. Flicking through the latest Scale Modeller magazine, I see Great Wall Hobby are just about to release a brand new P-61 in 1/48 scale. But I'm too far into this old Monogram kit now to suggest a change, and besides, it is now wired for light and sound, so no turning back, or even away. More of this build later...


For now, here is the Italeri/Kinetic EA-6B Prowler. Very expensive, but I've been waiting for this subject in a new tool for so long I felt I owed it to myself. Not quite forty years, of course.


And so far it's been a lovely project. All together now - more later....


Sunday 25 September 2011

Admiring Eduard


I've had a few projects going simultaneously, and this one has been quite slow out of the gate.

When I first started building Eduard models, I felt that they weren't much above low pressure injection moulded kits. Since then, though, I've had reason to revise my estimate.

One of the reasons for this is Eduard's MiG 21 SMT Fishbed K Profipack, in which you get everything - a set of masks, a double photo etch set (one in colour), two pairs of UB multiple rocket launchers in resin, a superb decals sheet for five aircraft, and stencils for the model and weapons. And not forgetting a full complement of weapons and fuel tanks.

The kit itself is lovely. It's an exercise in finely detailed and precisely fitting parts, which should describe every kit, but doesn't. These days value for money is quite rare, so to get all of the above in the box with a new tooling for around £35 is a bonus worth blogging about.

Here's a photo of the decals. As you can see, they're pretty comprehensive:


And here's the aftermath of a stencilling session - looks like confetti, doesn't it?


And finally here are a few photos of the completed build. It was as much fun as it looks. I used Xtracolour enamels and airbrushed them freehand. I weathered in very much the same way, then added the stencils. It took all day! More, as they say, soon.


Sunday 18 September 2011

Big project, big model, big nose!


The whole premise of building in 1/32 scale is that you get a lot of extra detail for your money. It's not the case with every model producer's kit - there are always exceptions - but the attraction, at least for me, is the promise of more to see than 1/48 can always offer.

Trumpeter's 1/32 Su-25 is no disappointment. This is exactly what modelling in this scale is about. Not only do you get a great cockpit, but also two detailed jet engines AND two sets of landing gear - one in metal. Also, left and right open nose panels with an electronics suite and optional lowered flaps. Then there are photo etched parts and an ordnance load that you wouldn't believe. The photos show less than two thirds of what's included. The decals are beautiful and offer a choice of four colour schemes. All in all almost 900 parts - it's not bad, is it?


And did I mention the superlative surface detail? Amongst the best I've seen - and I've seen plenty.

But how was the build, you ask? Well, mostly it went really well. There were a few minor glitches - usually down to discrepancies in the instructions. Did I use a lot of filler?I hardly had to touch the tube. The wing roots required a line of Krystal Kleer, and not much else.

What I enjoyed the most was the modular concept. I could build up the fuselage, cockpit, engines, landing gear and cabins, and then the wings with extended flaps. Then I could move on to the underwing stores. It was three weeks of building what seemed like several kits out of one box. Normally the painting is my favourite part, but with this model the construction was equally satisfying.


I couldn't finish this project and not consider a follow up. So, more soon on the new MiG 23 ML.

Saturday 27 August 2011

Almost a cliché..


Do you know how many P-51Bs I've built since Tamiya released the kit? It's just so good and I love the 'B'. The 'D' is good too, but like Garfield and Nermal, one is older but more interesting, whilst the other is just so beautiful! Anyway, I had a 'B' burning a hole on my shelf, so what should I do with it?

Then I noticed that Hannants had a set of Eagle Strike decals on the 31st FG. I was drawn to a tiny picture on the pack cover of a Squadron Signal book showing a P-51B in olive drab - a look I prefer to the metal finish. And that was the set for me.

Suitably armed with new decals and a colour etch set from Eduard, I got started and it turned as I knew it would into a real fun build. A new cockpit, an extra patchy exterior and room to add a few extras of my own.

Just great.


Tuesday 23 August 2011

More 'Stoof'..


Finishing the S-2F was a demanding process. It threw up a number of challenges: the crankcase holes had to be opened to accept the propellers; the parts for fitting the folded wing need some guesswork because the instructions are vague, and with the landing gear, the struts must be at perfect right angles to the leg or they just won't fit. Overall though, not a bad build.

But the painting was such fun. I wanted the model to have a really worn look, so I under-coated in dark grey. This had the effect of darkening the top colours, i.e. the grey and the white. This allowed me to add a lighter, patchy effect on top of that. White was the difficult colour, since you can't get paler than white. So I pre-shaded and applied the white thinly, just enough to cover. Later I applied a black wash, darkening the white. I was free then to add patches in pure white - how does it look?

I decided, for the sake of the model, to fold one wing only. It not only looks more interesting, but it eases display problems for such a large model.
So I've finally got a tracker in my collection. I should've waited a bit longer to acquire a different set of decals, but I just wanted to build the thing. You know the feeling...


Tuesday 9 August 2011

From Typhoon to Tornado


It's easy to take mainstream kits for granted. You don't give too much thought to what goes into producing an accurate and high quality model.

Then earlier this year I was asked to build a Hawker Tornado based on the excellent Hasegawa Typhoon kit, by David Walker, a client and friend of long-standing and I felt quite honoured to be asked to be part of something which was very important to him. David had asked Ozturk Modelmakers to produce a modified fuselage which would be integrated with the Hasegawa kit to produce an authentic Tornado. I knew from experience that it would be a lot of work, but I've never let that put me off. I was anxious to produce a good job, so with David's resources and modified parts and some reading round, I did a lot of preparatory work and then set to.

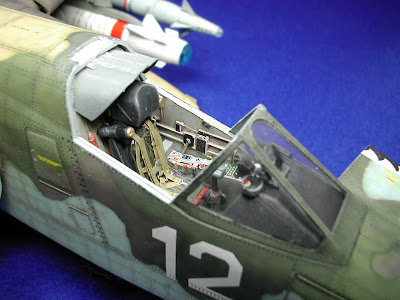
And there was more to do than I had anticipated. The urethane compound used in the conversion parts was good, but very fibrous. This made it hard to rub down and get a smooth finish. The cockpit area needed to be cleared completely of the urethane to get the internal parts to fit. I then discovered that the cockpit was slightly too far forward and the panel lines wouldn't match up. I needed to do some significant alterations to get it to fit in the now larger area I had created - this without damaging the outer skin.

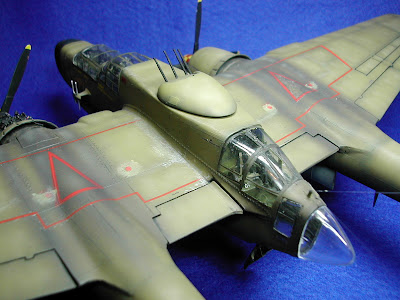
The propeller's spinner came with an extension, making this part bigger. My references showed that if anything, the spinner on the prototype was shorter, so I left this out.

Next came the double exhausts. The Typhoon exhaust slots had been nicely blanked, so after some careful measuring, I drilled into the nose and cleared out some new slots.
As work progressed, I cut off the moulded on cannon fairings and rubbed down the wing leading edge. The cannon bulges in the wings also had to go. All this was replaced by six machine gun ports and the corresponding chutes in the characteristic 'V' shape under the wing.

On test fitting the wings to the fuselage I noted a distinct lack of plastic at the wing roots. Also, with the 'chin' air intake removed, there were some large spaces to be filleted, filled and shaped. Of course, not only do these parts need to fit, they also had to resemble the Tornado prototype. The new air intake now fitted behind the landing gear and also had to be carefully shaped. The Tornado's own intake was surprisingly curvy and the model's urethane intake rubbed down alarmingly fast. But I managed to get it very close to the real thing. Wow, I thought, how arty am I? That thought lasted me about ten seconds and I ploughed on with the job.

The kit came with a replacement canopy which fitted perfectly but didn't look quite right. It was just too flat. I checked the photographic references and felt that the elevated view which presented it as slightly domed was the most authentic. The original kit canopy, once modified, made the perfect alternative. Cutting through the urethane replacement fuselage to fit the 'car door' seemed unnecessarily risky, especially since it was only representative. Could I add engraved panel detail? I had done this earlier to replace some panel lines lost through rubbing down. It was hard to avoid tears and gouges, but I used my artistic skills and was happy with the result. I find panel lines can be an area of contention due to their subjective nature. For me, if it looks right, it is right.

That's the bulk of the build. It was, as they like to say, a 'big ask'. No project like this is without problems. But the bottom line is that the final model looks the way it was intended to, so it's all good. Virtual hats off to Ozturk Models for their contribution, and to David Walker, whose research and references helped me to build him the aircraft he wanted.


Monday 25 July 2011

'...211 in progress'


Yes, it's the Kinetics S2E Tracker in 1/48, which has been malingering in my kit storage for some time, a crime I am about to set right.

It's not a kit which gives stunning detail, but it does have nice engraved panel lines and rivets, and the parts fit is not too disappointing. It mostly does what is says, and looks just like the photos say. Decals are by Fightertown, and go down real well, with good register.

Care above and beyond the usual to be taken when assembling the engine nacelles or you can end up with irritating gaps. The nose gear door needs its mounting bracket attaching first to ensure easy fitting to the gear leg, contrary to the instructions. Speaking of which....THEY ARE QUITE HARD to read, swapping as they do from UPPER CASE to lower case and back AGAIN. Test fitting more important than ever here then.

I'll be finishing the model soon, but already I think it will look pretty impressive. On the basis of size alone, it's quite a show-off. Just test-fitting it meant I had to stand in the hall.

So crime averted. Photos to follow. Next up for some caped crusading - the Hawker Tornado.