Friday 31 July 2009

A little Mystere

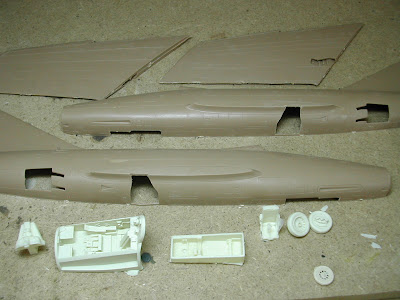
Every now and then I get a kit that offers a new challenge. Take Fonderie's Super Mystere - nice resin parts, lovely engraved panels, even the fuselage fit is not too bad. But which way up are these wings? Oh wait, the wheel wells give it away. There are no tabs, pins or lugs to locate them.
But the wing stubs are chamfered to give a distinct dihedral.
So, how to mount the wings correctly? That's next.

Less Fuss, more 'Pete'


Pete is now resplendent in his decals and more weathering. Although the decals conformed beautifully to the surfaces, the 'slip' factor when applying them was very limited. So more water and less setting solution was needed to slide the decals into position.
More soon.

Wednesday 29 July 2009

Big Beautiful Doll

This project showed promise right from the start. With all its difficulties and problems, I feel the end result is worthwhile and I hope you agree.

I had often considered building 'Big Beautiful Doll', but it sometimes felt as though everyone was getting there before me! I really enjoyed the build, and felt it had a lot of distinct character.

Adding the finishing touches was a particular pleasure - the last panels, the doors and lights, a little extra stencilling. It was a very rewarding project, and I hope its new owner will feel the same way.

Monday 27 July 2009

Mustang and Pete move on

As you can see, tempus has really fugit for the '51. Since you last saw it, it has undergone Alclad, weathering, glossing, decals, some more glossing and a bit more weathering. I must sit down for a moment.

The only real problem was with Tamiya's decals. They are always a bit on the thick side, so getting the check pattern to line up around the curvature of the nose involved giving it a good telling and a lot of setting solution. More on this later.

Coming up fast behind the '51 is the 'Pete'. Here are a couple of photos. The first colour coat is now dry, though this means it looks a little flat at the moment.


In the second view, things have livened up a bit as 'Pete' has his first weathering stage. Getting your paint mix right and having complete airbrush control are essential components in getting this dead bang to rights.


'Pete' has more weathering to endure yet. Also, look out for the big finish on the P51. It's very nearly complete and it looks pretty good. Photos soon.

Coming soon: The Fonderie Super Mystere.

Friday 24 July 2009

But I've just sat down....

In my last entry I briefly mentioned five ongoing projects. I work on any two at a time, and right now it's the turn of the P-51 and the Pete.

I've just added the olive drab anti-glare panel and black trim on the tail of the former. When it's dry I'll reverse-mask these areas so it can receive its bare metal finish.


The Pete is now all masked up and ready for its undercoat. I felt it best to paint other components such as the upper wing and floats separately to ease the job of painting and masking as the build progresses.

The real fun is about to begin. More later.

Sunday 19 July 2009

What Lies Beneath

Those of you who arrived here via eBay may do so having seen what looks like a few casually listed models. Indeed, we like to promote a relaxed but professional look as our public image. What lies beneath is actually a little different - certainly professional, but not so relaxed. Here's why:

Project One: This is the Super Mystere from Fonderie Miniatures. As you can see it's in the early stages of construction, but showing promise.


Project Two: This is the Tamiya P-51D with the Aires cockpit, gun/ammo tray and wheel well. It's been a long job getting it together -the wings were reluctant to join in - but worth it so far.


Project Three: Believe it or not this is the LA-5FN by Zvesda. A tricky kit to build, but when complete, it'll really look the part.


Project Four: Hasegawa's 'Pete'. It may look like a mess, but what a little gem.


Project Five: I've left this one till last because of its size. The Revell Fletcher Class destroyer has literally taken over half of my work room. Photographic and historical references are vital to this build. Every part fitted must look properly at home. Books and magazines cover every surface - in every room....


This is just a quick glimpse of the work currently under way. I'll be coming back to them individually later.

Can I stop now? I haven't sat down all day!

Tuesday 14 July 2009

For 'Pete's' Sake


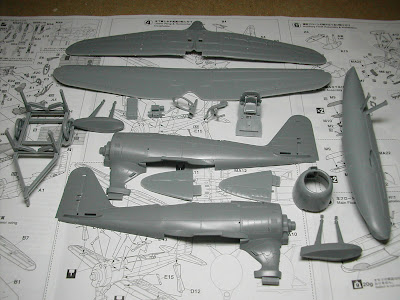
The nice thing with a Hasegawa kit is that you can relax and just stick it together, tootling along with the exploded diagrams and half your mind elsewhere. It makes adding a little extra detail a breeze - some extra plumbing or wiring, or some seat belts.

I just made a start on Hasegawa's new F1M-2 Seaplane, and it's lovely. It has beautifully engraved panel lines, perfectly fitting parts, and great convex panelling on the 'fabric' wings. If there's any disappointment, it is restricted to the photo-etched parts. These are referred to throughout the instructions, as a replacement of parts in the cockpit, but comprising the rigging. Unfortunately, they don't come with the kit. Why not? Why don't Hasegawa include them with the kit and boast this on the box, and thereby polishing their reputation? Why spoil the model for a h'aporth of rigging? Instead the metal parts 'may be purchased separately' at extra expense. This is ok for the interior parts, but the plane needs the rigging. Fortunately, I am stubborn and experienced, so I can make my own.

Here are some photos of most of the main parts made up into sub-assemblies. The centre float calls for 20gms of weight, which I have duly added.


The transparencies are very nice indeed, seen here masked and ready for paint, as are the other interior parts. More on this project soon.

Friday 10 July 2009

Trains and boats and planes

Just before Christmas last year, the last of our three children left home, and his room slowly emptied of twenty years of detritus belongings. As happens with empty rooms, some stuff has migrated into it for 'storage', but the boy seems happy in his new home, so I can finally have a room for my ..........trains.

Here's a picture of the room as empty as we've managed to make it so far. There is work to be done...


If you are reading this blog, it is because you are interested in aircraft modelling, so talk of trains may not do it for you. If so, here are a few photos of an on-going P-51 project. Of course, it is the Tamiya kit in 1/48 scale, being beautified by the Aires detail set.

The internal parts are already compete, so I'm modifying the plastic to accept the resin. Most of the surgery has been done, with only a little alteration to the upper wings and the removal of the cockpit coming later.


Finally, a word on the stop/start destroyer. The hull camouflage has now all been applied. Soon I'll move on to its superstructure. But what about all that overspray I hear you asking? I usually apply hard edged camo like this with the aid of Blu Tac, an effective medium for providing a nice edge without the paint build-up that masking tape gives. The resulting overspray is lost during the first weathering stage. I'll demonstrate this later.